Monday, September 30, 2013

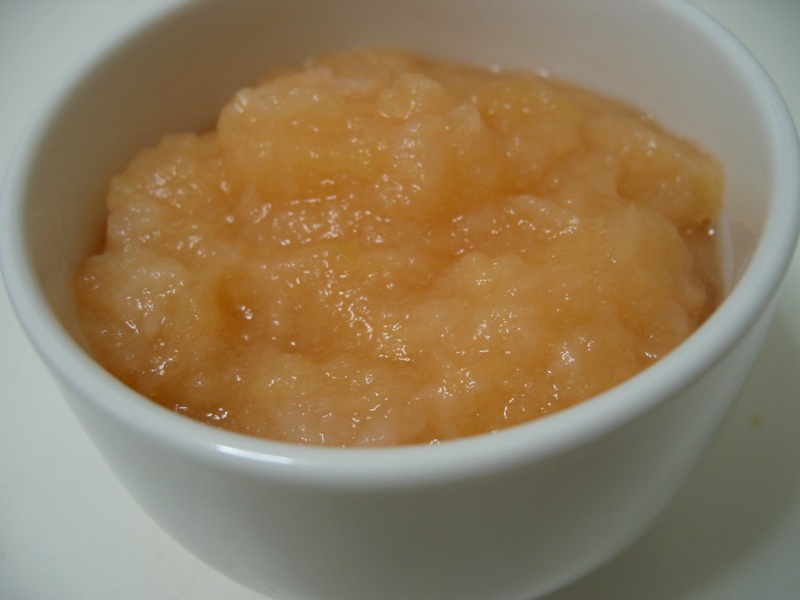
Homemade Applesauce

Yesterday my husband and I took our daughter apple picking.  She had quite the time "running" between the trees (more like wobbling and tripping!), biting into my apple and having the juice run down her face, and picking a couple of apples off the branches.

We picked so many apples that I knew I had to kick into full gear so that they wouldn't go to waste.
I've never made applesauce before and I never really ate it growing up, but I remember my daughter tasting it once and loving it, so I thought I'd try and make some myself.

It turned out amazingly! All three of us are enjoying this applesauce everyday.  I've frozen some and read that it can last several months if packaged properly, but I doubt ours will last that long!

Ingredients:
12 apples (of your choosing)
Juice of 1 lemon
1 cup brown sugar (I used both dark and golden)
A splash of vanilla
1 cinnamon stick, broken (or ground cinnamon)
pinch of salt

Directions:
1. Pee, core and slice or chop the apples. They don't have to be that small as they will break down on their own as they cook.
2. Place in a cast iron Dutch oven (or any pot you have handy).  My apples went right to the top of my pot.
3. Squeeze the juice of a lemon over top.  Sprinkle with the sugar, vanilla and cinnamon and give it a stir to mix it all together.
4. Pour water to cover the bottom of the pot.  I actually put quite a bit more because of how full it was, maybe about 1/3 of the way up, and I think it turned out great!  Sprinkle with salt and give it one more stir.
5. Cook over medium-high heat, covered.  Stir occasionally to prevent any sticking and to distribute the heat and flavours throughout.  Simmer for about 20-30 minutes, or until the apples break down.  The longer you let it simmer, the softer the apples get and the more they break down.
6. Remove from heat, remove the cinnamon stick and mash with a potato masher or puree in a blender. I mashed mine because I preferred the lumpier texture.

And voila! You have some yummy applesauce.  It tastes just like the inside of a really good apple pie!


Saturday, August 31, 2013

Classic Belgian Waffles

I love breakfast - especially a sweet, dessert type breakfast! This is my last weekend before returning to work after my maternity leave.  So this morning I woke up feeling like waffles.  I pulled out my recipe, my waffle iron and I got mixing!

This recipe creates a light and fluffy waffle that tastes so good.  And you can top it with whatever you want: maple syrup, strawberries and whipped cream with a dusting of icing sugar, nutella and bananas - the possibilities are endless!

My waffle iron makes 4 at a time, so this recipe will take you through about 3 rounds.  I normally get 10-12 waffles, depending on how full I fill it each time.

Ingredients:

2 cups cake flour
2 tsp baking powder
1/2 tsp salt
4 large eggs, separated
2 tbsp sugar
1/2 tsp vanilla extract
4 tbsp unsalted butter, melted
2 cups milk

Directions:

Preheat the waffle iron according to the manufacturer's instructions. In a medium bowl sift together flour, baking powder and salt; set aside.

In a second bowl using a wooden spoon or electric mixer, beat together egg yolks and sugar until sugar is completely dissolved and eggs have turned a pale yellow. Add vanilla extract, melted butter and milk to the eggs and whisk to combine.  Combine liquid mixture with flour mixture and whisk until just blended. Do not overmix!

In a third bowl, beat the egg whites with an electric mixer until soft peaks form, about 1 minute. Using a rubber spatula, gently fold the egg whites into the waffle batter. Don't overmix!

Coat iron with non-stick cooking spray and pour batter into iron just to cover the waffle grid. (For mine, I'd put about 1/3 cup of batter for each square, but I'd place closer to the middle to avoid a lot of spillover!) Close and cook per manufacturer's instructions until golden brown, about 2-3 minutes. (I set my iron to "3" or "4".  Once it beeps the first time I open it up and close it again and let it beep a second time.  This allows for a crispier and less soggy waffle.)

Serve immediately.

These waffles also freeze great so you can make them in large batches and pull them out whenever you want waffles for breakfast - just pop them in the toaster!


Batter and egg whites, still separate.


Folding in the egg whites.


Sometimes my batter doesn't make it quite to the edges, so my waffles are a funny shape!


Last round of waffles.  It spilled over some edges, but still didn't fill in all the wholes!


Waffles and maple syrup - yum!

Friday, August 16, 2013

A Tuscan Dinner

Tonight's dinner idea came from Rick Rodgers, The Carefree Cook.  I had bought some pork side ribs on sale and wanted to BBQ or slow-cook them, but I couldn't find anything interesting to me in my collection of cookbooks (and it hasn't been BBQ-ing weather).  But I did find this oven-roasted recipe in one of my books, and today was finally the day I had some time to make it.  The recipe recommends serving these ribs with polenta and sauteed green beans, so that is exactly what I did.  My daughter took a nice hour and half long nap, which gave me plenty of time to do most of the prepping and cooking.  And my hubby pulled into the driveway as I was finishing the final touches and bringing everything to the table. All three of us enjoyed our dinner; my daughter loved the polenta and ribs - she made a mess trying to feed herself!

Tuscan Roasted Ribs

Ingredients:
4 garlic cloves
1 tsp salt, divided
1.5 tsp dried basil
1.5 tsp dried oregano
1.5 tsp dried rosemary
1.5 tsp dried sage
3/4 tsp black pepper
2 tbsp extra-virgin olive oil
approx. 5lbs ribs
3/4 cup dry white wine (I used red wine)

Directions:
1. Position a rack in the center of the oven and preheat to 350F.
2. Crush the garlic and coarsely chop.  Sprinkle 1/2 tsp salt and mix together in a mortar and pestle until it forms a paste. Scrape into a bowl and add the basil, oregano, rosemary, sage, pepper, and the remaining salt. Stir in the oil to make a paste.
3. Rub the herb paste all over the ribs.  Place the ribs in a very large roasting pan (It's okay if they overlap slightly. They just curved around my pan and fit perfectly!) Roast, basting occasionally with the juices in the pan, for 1 hour.  Turn the ribs and continue baking and basting until they are browned and tender, about 1 more hour.  Transfer to a cutting board and let stand while you make the sauce.
4. Tilt the pan and spoon off the fat, leaving the dark juices in the pan.  Place on two burners over high heat and heat until the pan is sizzling.  Add the wine and use a flat wooden spoon to scrape up the browned bits in the pan.  Cool until the wine is slightly reduced, about 2 minutes.  Pour the sauce into a small bowl.
5. Cut the ribs between the bones and place on a serving platter.  Serve immediately, topping each serving with a spoonful of the sauce.

I didn't care much for the sauce.  I don't know if it was the red wine or that I didn't cook it long enough (I cooked it for almost 5 minutes), but the wine flavour was very strong. I must have also left some fat because my sauce separated and really didn't do much to the flavour of the ribs.  The ribs tasted amazing though all on their own.

Pan-Fried Herbed Polenta 

Ingredients:
1 tbsp extra-virgin olive oil
1 medium onion, chopped
2 garlic cloves, minced
2 cups chicken broth
2 tsp salt
1 cup cornmeal (coarser gives better texture)
2 tsp dried basil
2 tbsp butter

Directions:
1. Heat the oil in a medium heavy-bottomed saucepan over medium heat.  Add the onion and cook, stirring often, until softened, about 3 minutes. Add the garlic and cook until it gives off its aroma, about 1 minute.
2. Add the chicken broth,  2 cups water and salt and bring to a boil over medium-high heat. Stirring constantly, gradually add the cornmeal. Reduce the heat to medium-low and simmer, stirring very frequently.  Add the basil.  Continue stirring and cooking, about 15 minutes, until the polenta pulls away from the sides of the pan and it is tender.  Stir in the butter.
3. Spread the hot polenta in a greased 8" square pan.  Let cool completely.  Cut into 9 squares. Heat 2 tbsp olive oil in a non-stick skillet over medium-high heat.  Add the polenta squares and cool, turning once, until golden brown on both sides, about 5 minutes.

I'm used to eating soft polenta with a hearty tomato sauce/stew over top.  My grandparents would pour the polenta over a wooden board over the kitchen table and we would all cut off our portion, add the sauce and eat away.  This recipe is very different from what I'm used too.  I know my husband doesn't really like polenta that way (or at all). so I thought he'd like it better cooked this way.  Plus I could cook it in advance while the baby was sleeping, let it cool and harden and then quickly fry it up right before everything was ready.  The verdict: he still doesn't care much for polenta.  I enjoyed it, but missed the sauce I'm used to.  My daughter simply loved it!

Garlicky Sauteed Green Beans

Ingredients:
1 pound green beans, stem ends snapped off and beans cut in half
1 tbsp olive oil
salt and black pepper
1 tsp dried thyme
1/4 cup water
3 garlic cloves, minced
1 tbsp butter

Directions:
1. In a skillet, heat oil over medium heat.  Add beans plus salt and pepper and thyme.  Toss to coat and cook, stirring occasionally, for 4-8 minutes, or until beans are spotty brown.
2. Add 1/4 cup water, cover and cook for 2-3 minutes.  Remove lid and cook until the remaining water has evaporated, about another minute.  Add garlic and toss, cooking for another minute.  Add butter, toss and cook for another 2-3 minutes, until the beans are crisp-tender.

These beans tasted so yummy! They were a little to crispy for my little one, or maybe too garlicky - she just spit out the pieces.  But hubby and I devoured them.

And of course I forgot to take a picture of my beautiful dinner setting, so tomorrow I will try and remember to take a picture of the leftovers (sans green beans!). 

Some picture I found online.
 

Friday, August 2, 2013

One Pot Roasted Chicken & Potatoes

This recipe comes together so easily. The prep is so fast and you only use the roasting pan so it's a quick clean up as well! I made this for our four year anniversary yesterday.  With a little baby crawling/walking around and demanding my undivided attention, the ease of this recipe is very helpful! And all three of us really enjoyed the flavour!

Ingredients:
1 large chicken (about 1.5 kg)
sea salt and black pepper
olive oil
1 head of garlic, halved horizontally
2 lemons
rosemary and thyme
4 carrots, quartered
1 onion, chopped into large pieces
5 potatoes, peeled and chopped
1 pkg (227g) sliced mushrooms
1/3 cup wine
1 cup chicken stock

Directions:
1. Heat the oven to 450F.  Rub the chicken all over with salt, pepper and drizzle with olive oil.  Place in  a large roasting pan and stuff the cavity with half of the head of garlic, one lemon halved, and some rosemary and thyme.

2. Roast the chicken for 20 minutes.  Meanwhile, prepare your vegetables (carrots, potatoes, onion).  Take the chicken out of the oven and lower the oven to 425F.  Add the onion, carrots and potatoes around the pan.  Quarter the remaining lemon and place around the roasting pan with the remaining garlic.  Drizzle olive oil over the chicken and vegetables; sprinkle with salt, pepper, rosemary and thyme. Roast for another 15 minutes.

3. Lower the oven to 400F. Add the mushrooms around the pan.  Drizzle with a little bit more olive oil, then pour the chicken stock and wine over the vegetables. I used red wine simply because that's what I had handy.  Either wine works fine, but the red will stain your potatoes a bit. Roast for another 30-35 minutes, or until the chicken is golden brown and cooked through - the juices should run clear when the thickest part of the thigh is pierced with a knife.

4. Place the chicken on a platter, cover with foil and let it rest for 10 minutes.  Place the vegetables in a serving dish and keep warm.

5. Carve the chicken and serve with the vegetables.  Spoon some of the cooking liquid over each.

This will easily serve 4 people! As I forgot to take a picture of my beautiful creation, these photo from the web will have to do until I cook it again! Buon'appetito!
(The picture on the right is more like the colour of the chicken from this recipe.)


Monday, July 29, 2013

Peperonata

This recipe comes straight from my nonna.  Because she never measures when she cooks, everything below is an approximation.  The amount of vegetables you use is all in relation to each other. Since this stews for a very long time, make sure you don't chop the vegetables too small or you won't have anything to bite into! This recipe works great with all the fresh vegetables from the garden. This is one of my most favourite things to eat.  Pick up a nice bread stick or a ciabatta bun and enjoy! (And my 1 year old daughter loves it too!)

Ingredients:
2 large red peppers, sliced and seeded
2-3 large onions, thinly sliced
2-3 cloves garlic, thinly sliced (optional)
2 medium zucchinis, chopped
1 medium eggplant, peeled and chopped
1 jar diced tomatoes or 3-4 medium tomatoes, diced
salt and pepper
extra virgin olive oil

Directions:


1. In a large pot on high heat, saute onions (and garlic if you're using) with oil until softened and just starting to brown.
2. Add red peppers.  Season with salt and pepper. Stir and saute until softened.
3. Add zucchini and eggplant and stir.  Lower to medium heat; cover and simmer.  Mixture will soften and reduce; liquids will emerge.  Simmer until the majority of the liquid has been evaporated. (This could take a long time, depending on how much liquid there is).  Stir occasionally to prevent vegetables from sticking to the pot.
4. Add tomatoes and let simmer on low heat until it has reduced, approximately 3 hours.  Stir occasionally to prevent sticking.
5. Serve immediately or reheat as needed.  This can also be frozen and stored for later use.


Saute the onions.

Add the red peppers.
After the red peppers have softened.

Adding the zucchini and eggplant.


As the liquids emerge & veggies reduce.
Adding the tomatoes.
The final product.


Friday, June 21, 2013

Banana Yogurt Loaf

Anna Olson is one of my all-time favourite bakers.  I recently got her newest cookbook, Back to Baking, and have tried a few recipes from there with a lot of success.  This Banana Bread recipe is an adaptation of her Morning Glory Yogurt Loaf.  It was my first time making this and trying my modification, but I think it turned out pretty good.  It was very moist.  What I did notice was that it took much longer to bake than her recipe states.  I think this might be because of all the bananas I put in it, but I'm not too sure.  Next time I will try using less bananas and see what happens.

Ingredients:
6 tbsp butter, at room temperature
1 cup sugar
3 eggs, at room temperature
2/3 cup plain yogurt (I used Greek yogurt)
1 tsp vanilla extract
1-2/3 cups all-purpose flour
2 tsp baking powder
1/4 tsp salt
pinch ground cinnamon
4 ripe bananas, mashed
1/3 cup (approx.) white chocolate chips
1/2 cup (approx.) semi-sweet chocolate chips

Preheat oven to 325F and grease a 9x5" loaf pan.

Cream the butter and sugar together.  Add the eggs to the butter mixture, one at a time, blending well after each addition.  Stir in the yogurt and vanilla.

In a separate bowl, sift the flour, baking powder, salt and cinnamon.  Stir this into the butter mixture.  Stir in the bananas, and then the chips.  Scrape the batter into the prepared pan.

Bake for 70 minutes (mine took closer to 90 minutes), until a tester inserted in the centre of the cake comes out clean.  Cool the loaf for 30 minutes, then tap it out of the pan to cool completely on a cooling rack.  The loaf will, keep, well wrapped and unrefrigerated, for up to 3 days.

Thursday, June 20, 2013

Sticky Toffee Pudding

Two years ago my husband and I went to the UK for a vacation and we discovered sticky toffee pudding in York. And what a discovery it was! It now ranks pretty high on my list of all-time favourite desserts.  When I returned home I went on a search for a recipe to make my own sticky toffee pudding whenever my heart desired.  And in case you didn't know, it is not a pudding.  We learned ourselves in England that pudding is just their word for a dessert.  I found this recipe in a book called Favorite Foods by Jill Dupleix. I've made this dessert on a few occasions and always get good reviews.  I'm making it tonight for a Mommies Night Out that I'm hosting at my house.  And I'll tell you that this recipe tastes exactly like the one I had in England.
The dessert we discovered in York!

Ingredients - Cake:
180g (about 1 to 1-1/4 cups) dates, pitted and chopped
1 tsp baking soda
1 cup boiling water
1/4 cup butter
2/3 cup soft brown sugar
2 eggs
1-2/3 cup flour
2 tsp baking powder
1/4 tsp salt

Ingredients - Toffee Sauce:
2/3 cup brown sugar
250ml (1 cup) whipping cream
1/2 tsp vanilla extract
1 tbsp butter

Heat oven to 350F.  Mix dates and baking soda in a heat-proof bowl. Pour boiling water on top and let it sit. Sift together flour, baking powder and salt in a small bowl and set aside.

Cream butter and sugar until pale, then add eggs one at a time, beating well after each addition.  Gently fold in the sifted flour mixture, stir in the date mixture and then pour into a lightly greased (8") square pan.  Bake for 30-40 minutes, until an inserted toothpick comes out clean.

Combine sugar, cream, vanilla and butter in a sauce pan, bring to the boil over medium-high heat, stirring.  Lower heat and simmer for 5 minutes, stirring.  (I often find that if I simmer it longer, the sauce comes out even thicker.) Set aside until ready to serve, then reheat when needed. Cut the cake into squares and pour the sauce over, serving warm.

Here is how I normally serve this pudding: Pour a spoonful of the sauce on a plate, cut a good size piece of cake and place on top.  Then put another 1-2 spoonfuls of the sauce on top of the cake.  Pop it into the microwave for 45 seconds - 1 minute (depends on the size) and serve.  Traditionally you would add a spoonful of double cream (I find it in a small jar at the Superstore) over top, but you could also use vanilla ice cream, fresh cream, etc.

This recipe says it feeds four - but those must be HUGE servings.  I find that you could serve 8-10 people with very generous portions and everyone is happy.

The mommies loved it and there was just enough left over for my husband and I to enjoy a piece for breakfast the next morning with a nice latte!

Of course in my rush to make the dessert while my daughter was sleeping, I forgot to take pictures of the process, but here is a pic of my creation at our breakfast this morning!