Thursday, April 25, 2013

Rice Cooker Mac n Cheese

We use our rice cooker quite a bit - so much so that my husband went out and bought a super-duper fancy one. We use it to make rice (obviously!) and quinoa mostly. When I heard that you could mac n cheese in a rice cooker, I had to try it! And I have to say it turned out quite nice. The cheese didn't melt as well as it should have, but I think that's because I only had fettuccine in my cupboard and it didn't allow enough room for the cheese to blend and melt.

Ingredients:

2 cups pasta
1.5 cups chicken stock
Salt
1 cup milk
1.5 cups grated cheese (I used cheddar, mozzarella and Swiss)

Directions:

1. Put the pasta and chicken stock in the rice cooker and season with salt. Set it to cook for about 15 minutes; most of the liquid will evaporate.

2. Add the milk and cheese and give it a stir. Let it cook for another 20 minutes or so. You may have to stir it once or twice in this time period.

(Each rice cooker is different so keep an eye on it. After about 10 minutes mine switched to the warm setting and the bottom was already getting crusty while there was still quite a bit of liquid. After another 5 minutes the liquid was gone and it was quite creamy.)

3. Serve. You can add some more grated cheese on top.

This served me and my husband with no leftovers.


Update: I've made this recipe several times since with macaroni and it definitely turns out much better!  I've actually increased the grated cheese to 2 cups (and always use a mix of different cheeses) and also increased the milk to about 1-1/3.  It will take a little longer to cook, but it definitely comes out creamier and cheesier.

Wednesday, April 24, 2013

Honey Beer Bread

This recipe has been circulating on Pinterest so I decided to try it one day.  And it turned out so yummy!  When I went back to get the recipe and make it on Easter, the website I got it from was down.  So here is the recipe - I've made it several times and it always turns out so well.  It comes together fairly easily.  The butter makes such a beautiful crust on the bread and adds such an amazing flavour!
So because every time I make it I am asked for the recipe - here it is!

Ingredients:

3 cups all purpose flour
1 tbsp baking powder
2 tbsp sugar
1 tsp salt
2 tsbp honey
1 bottle beer (I used Brava)
1/4 cup butter, melted ( I actually use more like 1/2 cup because it adds such colour and flavour)

Directions:

1. Preheat oven to 350F.  Grease a loaf pan with non-stick spray.  Cut a piece of parchment to fit the bottom of the pan.

2. In a large bowl, whisk together the dry ingredients. Heat the honey in a glass of warm water for a few minutes to make it easier to stir, then add the honey and the beer to the batter. Mix until all ingredients are blended well.

3. Pour half of the melted butter into the bottom of the pan.  Spoon in the batter, then drizzle the rest of the butter on top.  If needed, spread it with a pastry brush (this gives it a nice golden crust).

4. Bake for about 60 minutes until the top is golden brown and a toothpick/knife inserted in the middle comes out clean.

Tastes great warm on its own, but it also tastes great with nutella or jam or butter spread over it.  Warm bread and butter is always so amazing!
Although I haven't tried it yet, I'd like to grate some (cheddar) cheese and add it to the batter - I'm sure it'd taste amazing!


A Cheesy Variation: I've made this recipe with the addition of cheese and it turned out pretty yummy too!  Most recently I used cheddar cheese - a mix of aged Balderson cheddar and a medium orange cheddar.  I used about 1-1/2 cups and reserved about 1/3 cup to sprinkle on top before pouring the melted butter over top.
Top: Cheesy variation
Bottom: Standard honey beer bread

Another Barley Dish - Italian Barley Stew

I saw recently on Breakfast Television a whole segment on barley. They called it Canada's answer to a superfood.  I also learned that there were different types of barley, which I really didn't know much about.  They made a stew-type dish using pot barley.  I did some research and I found out that pearl barley (which is what I used in my other post)  is the most common form used in cooking, but it is also the least nutritious because it is stripped of the bran layer.  Because of this it also cooks the fastest. Pot barley isn't as heavily processed, so it is more nutritious and takes a little longer to cook.  From what I was able to gather, you can pretty much use them interchangeably, with some possible slight modifications to cooking time.

This dish is a lot like a stew as well, but I found it thicker and more hearty.  For lack of a better name, I decided to call it an Italian barley stew simply because of the herbs that are used in it.

Ingredients:

1 onion, thinly chopped
2 tbsp oil
3 cloves garlic, minced
1 large carrot, peeled, quartered and thinly chopped
1 acorn squash, peeled, seeded and chopped into approx. 1/2" cubes
1 tbsp dried basil
1 tsp dried oregano
1/2 cup red wine
1 cup pot barley, rinsed
1 cup chicken stock
1 can diced tomatoes
salt and pepper to taste
1/2 cup grated Parmesan cheese

1. Saute onion with oil in a medium pot over medium-high heat till they start to get a golden colour.  Add the garlic and carrots and saute for a couple of minutes until the carrots soften slightly.  Add the squash.  If the pot is dry, add a little bit of oil to the pan.  Saute for another couple of minutes.
2. Add the basil, oregano, salt and pepper and stir; saute for a minute.  Add the wine and scrape up all the bit at the bottom of the pot.  Add the barley and give it a stir.  Let it saute for another couple of minutes.
3. Stir in the broth and tomatoes. Bring to a boil and stir once again.  Lower the heat, cover the pot and let it simmer for about 45 minutes until the barley is cooked and tender.  Stir occasionally to prevent the stew from burning
4. Remove from heat and let it sit for 5-10 minutes.  Place into serving bowls and sprinkle grated cheese over top

Wednesday, April 17, 2013

Crustless Quiche

This quiche comes together quickly and easily and is so very filling!  It warms up nicely in the microwave - if you have any leftovers!


1 pkg (227g) sliced mushrooms
1 clove garlic, minced
1/2 bag baby spinach
6 eggs
3/4 cup milk
1/2 cup feta cheese (or to your taste)
1/2 cup grated Parmesan
1 cup mozzarella, shredded
salt and pepper to taste

1. Preheat oven to 425F. Place the sliced mushrooms in a pan coated with non-stick spray with the garlic and salt and pepper.  Turn the heat to medium-high and saute the mushrooms until they release all of their moisture and no water remains in the pan, approx. 5-10 minutes.

2. Spray a pie dish with nonstick spray.  Spread the baby spinach on the bottom of the pie dish.  Add the cooked mushrooms and crumble the feta over top.

3. In a medium bowl, whisk together the eggs until smooth.  Add the milk, Parmesan and some salt and pepper.  Whisk to combine.  Pour the egg mixture into the pie dish, over the vegetables and feta.

4. Sprinkle the mozzarella over top.  Place the pie dish in the oven and bake until it is golden brown on top and the center is solid, approximately 30-35 minutes.


Saturday, April 6, 2013

Tomato sauce

I'm very fortunate that my family has jarred their own tomato sauce for years. So whenever I need to make something that requires sauce, I can just go downstairs and bring up a jar of sauce. It's basically ready to go the way it is, but I always add a little more to it and let it simmer before using it.

You can easily make "fresh" sauce on your own using a can of crushed tomatoes, some veggies and herbs.

Ingredients:
1 can crushed tomatoes (or a jar of your own sauce if you have it!)
1 onion, finely chopped
2 cloves garlic, thinly sliced
1 carrot, peeled, quartered and sliced
1 celery stalk, thinly chopped (I often leave this out because I never seem to have celery around!)
1 tbsp tomato paste (if you don't have this that's okay)
Basil, oregano, bay leaves - to taste, about 1-1.5 tsp dried herbs or tbsp of fresh
Salt and pepper to taste

Directions:
Sauté the onion in olive oil over medium heat for about a minute and add the garlic. After a couple of minutes add the carrot and celery and cook until softened, about another 5 minutes. Add the tomato paste, salt and pepper and stir.
Add the crushed tomatoes and herbs and bring to a boil. Lower heat, cover and let it simmer for at least an hour until the sauce has reduced and thickened. If you used whole bay leaves, remove and discard.
At this point you can use an immersion blender to roughly blend the sauce to thicken it and make it a smoother consistency.


Friday, April 5, 2013

Vegetarian Lasagna

Lasagna is a great make-ahead dish.  It sits well in the fridge, assembled, for up to a day. This makes it great for when you are having people over because you can just take it out of the fridge, pop it into the oven and hangout with your guests.  It does take some time to make and assemble, but the payout is so worth it in the end.  This lasagna is so hearty that you really don't need anything else with it, except maybe a salad if you really want.  You can also adapt this recipe to make in smaller dishes that you can freeze and take out whenever you need it.  With that said, you can also freeze a large tray of lasagna too.  Lasagna makes a great left-over dish as well, for lunch the next day or even for dinner two nights in a row.

Ingredients:
approx. 2 boxes oven-ready lasagna (or you can use the one you have to boil - just don't forget to boil it!)
Tomato sauce (any jarred sauce works, or you can use this recipe here)
approx. 2 cups ricotta cheese (I use at least 3/4 of a 1kg tub)
1 pkg frozen chopped spinach, thawed and squeezed out
3 eggs
1/4 cup Parmesan cheese
1 onion, finely chopped
2 cloves garlic, minced
1 carrot, peeled, quartered and chopped
1 red pepper, finely chopped
1 zucchini, quartered and chopped
1/2 pkg (227g) sliced mushrooms
1/2 butternut squash,  peeled, quartered and chopped (I used the top half)
1 cup mozzarella, grated
1/4 cup Parmesan cheese
salt and pepper

Before you can assemble the lasagna, you will need to prepare each layer separately.  If you are making your sauce, let it simmer for about an hour before using.

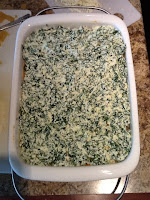
To make the spinach-ricotta mixture: Combine the spinach and ricotta together in a bowl with the eggs.  Make sure everything is well incorporated. Add 1/2 tsp each of salt and pepper and 1/4 cup Parmesan cheese.  Give it another stir and set aside.

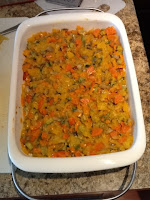
To make the veggie layer: Heat some olive oil in a pan over medium heat and saute the onion for about 1 minute. Add the garlic and saute for another minute.  Add the carrots and saute for another couple of minutes, until the carrot softens.  Add the mushrooms and do the same.  Finally add the rest of vegetables and saute for another 5 minutes.  Season with about 1 tsp each of salt and pepper.  Lower the heat, cover and let it cook for another 5-10 minutes.


To assemble: Pour enough sauce to cover the bottom of a large (9x13") baking dish.  Place about 5 lasagna sheets (or however many you need to cover the dish) on the bottom of the dish, overlapping slightly.  Spoon about half of the ricotta-spinach mixture over the lasagna, covering the sheets.

Place another layer of lasagna sheets and then spoon the veggie mixture.
 Pour some more sauce over the veggies (not too much) and cover with about half of the mozzarella.  Place another layer of lasagna sheets followed by the remaining ricotta-spinach mixture, followed by another layer of lasagna sheets.  Pour the remaining sauce over the top and sprinkle with the remaining mozzarella and 1/4 cup Parmesan.


Bake, covered with foil, in a 400F preheated oven for about 45 minutes.  Remove the foil, lower the oven to 375F and bake for another 5-10 minutes, until the cheese is completely melted.  Let it rest for a few minutes before cutting into it!


Thursday, April 4, 2013

Banana Muffins

I love banana muffins.  They are so yummy and make a great snack or even a breakfast-on-the-run.  I often find myself making this recipe after I put my daughter to sleep.  Then I catch one of my shows as the muffins bake, the delicious smell taking over the main floor.  I can hardly wait to eat the muffins, but I always try to let them cool a little bit so they don't stick to the muffin wraps!  And before I know it, I've eaten several.

I've tried my fair share of banana muffin recipes, and I love this one because it creates such a moist muffin.  The secret to its moistness? Yogurt.  And I've started using Greek yogurt because I'd like to think it makes the muffins that much healthier.

I've even adapted this recipe to be dairy-free, and I will post that recipe in another blog post.

This recipe easily yields 24 muffins.  I dare you to make them last more than a couple of days!

Ingredients:
1/2 cup oil
1 cup sugar
1 egg
1/2 tsp vanilla
1 cup yogurt
1.5 cups flour
1/2 tsp salt
1 tsp baking soda
1 tsp baking powder
2 medium bananas, mashed (sometimes I use more to get a very banana flavour)
1 cup semi-sweet chocolate chips (optional)

Directions:
1. Mix the oil, sugar, egg, vanilla and yogurt together in a large bowl; set aside.
2. In a separate bowl mix the flour, salt, baking powder and soda.  Add these dry ingredients to the wed ingredients. Then add the mashed bananas.  Add the chocolate chips if you like.
3. Put batter in lined or greased muffin tins about 3/4 full.  Bake in a preheated 365F oven for 20 minutes.