Saturday, December 23, 2023

Grinch Themed Peanut Butter Blossoms

 I saw these cute cookies in a Facebook group I'm part of that turned Peanut Butter Blossoms into a cute green Grinch themed cookie with a little red heart. I had never heard of or tried these cookies before, but I thought "Why not?" and gave it a go.  They were creamy and tasty, but next time I will need to make them smaller.  My cookies were way too big and didn't look cute so much as a female body part! 


Ingredients:

  • 1 cup peanut butter
  • 1/2 cup butter
  • 1/2 cup sugar
  • 1/2 cup brown sugar
  • 1 egg
  • 3 tbsp milk
  • 1 tsp vanilla
  • 1-1/4 cup flour
  • 3/4 tsp baking powder
  • 1/4 tsp salt
  • additional granulated sugar
  • Hershey's kisses, unwrapped (about 35-40 of them)
  • Green food colouring
  • Red cookie icing (for the hearts)
Directions:

  1. In a small bowl combine flour, baking powder and salt.  Set aside.
  2. In a large bowl cream together peanut butter, butter and both sugars.  Once it is light and fluffy beat in the egg, milk and vanilla.  At this point I add in a few drops of green food colouring if I am turning them into Grinch cookies
  3. Add in the dry ingredients and combine.  Add in more green food colouring until the desired green is achieved,
  4. Heat oven to 375F.  Shape dough into 1-inc balls and roll in additional granulated sugar.  Place on ungreased cookie sheet, about 2 inches apart. 
  5. Bake 10-12 minutes or until the edges are slightly brown and the cookie begins to crack.
  6. Press 1 unwrapped Hershey Kiss in the center of each cookie.  Remove from cookie sheets to cooling rack.
  7. When cookies are completely cooled, draw a little red heart on each cookie using the red cookie icing. (I used the Betty Crocker brand.)

Saturday, December 16, 2023

"Un-Spritzed" Cookies

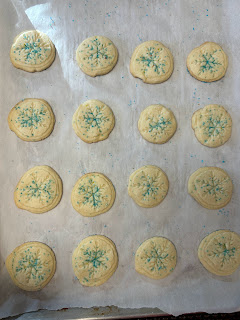
 This cookie is called "un-spritzed" because it takes the dough of a spritzer cookie and instead of pushing it through the cookie press, you simply roll and stamp or flatten with a fork.  It saves a little time and they look really pretty if you have nice cookie stamps!


Ingredients:

  • 1 cup butter, softened
  • 3/4 cup sugar
  • 1 egg
  • 2-1/4 cups flour
  • 1/2 tsp baking powder
  • dash salt
  • 1 tsp almond extract
Directions:

  1. Cream butter until light and fluffy; add sugar. 
  2. Add egg, unbeaten; beat well.
  3. Add dry ingredients and extract.
  4. Roll in balls and and place 1 inch apart on cookie sheet. Press down with stamp or fork.
  5. Put some coloured sugar or sprinkles on them.
  6. Bake in preheated 350F oven for 9-12 minutes until the bottoms just start to brown.
  7. Cool for a few minutes on tray before transferring to cooling rack.
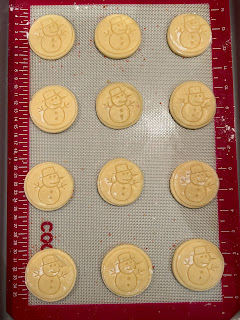
    The cookies before they are sprinkled and baked. 


Tuesday, June 13, 2023

Cast Iron Peach Cobbler

 Last year my sister got me a LODGE cast-iron skillet and cookbook for my birthday.  She raved about her own cast iron skillet and how much they cook in it.  Even though I owned one, I didn't cook very often with it. I'd read that it may help with low iron which is something I struggle with and the cookbook had so many great ideas and even tips on how to cook with cast iron.  So I jumped in with both feet and have really enjoyed using it.  At some point in the last year I attempted a peach cobbler which turned out great, so tonight I wanted to make it again for dessert (I have some very ripe peaches in my kitchen!).  For some reason I couldn't remember the recipe I used and kept flipping through my book with no luck. I tend to leave notes beside a recipe I've used and had no luck with the recipes I thought it was. 

So I picked one, tweaked it and hoped for the best. And the result was so amazing: the edges were caramelized and crunch, the peaches so tasty, the batter light and fluffy .  The kiddos said that this was way better than the last time (the secret is alcohol!) so I made sure to make my notes in my cookbook and as an extra precaution, I'm adding it to my blog!

Ingredients:
-11 oz peeled, pitted and sliced peaches
-1 cup granulated sugar
- 1/2 cup firmly packed brown sugar
-1/2 cup plus 2 tbsp flour
-juice of about 1/3 lemon
-1 tsp cinnamon, divided
-1/4 cup butter
-1/4 tsp baking powder
-1/4 tsp salt
-1/2 cup milk
-1 tbsp liquor, like Jack Daniels whiskey

Directions:

1. Place a 10" cast iron skillet in the oven and preheat it to 350F. 

2. Stir together the peaches, 1/2 cup granulated sugar, brown sugar, 2 tbsp flour, lemon juice, 1/2 tsp cinnamon in a bowl.  Set aside.

3. When the oven is preheated, add the butter and return to the oven to melt and brown.  The butter will brown around the edges and foam.  The butter needs to be very hot!

4. Add the liquor to the peaches and give it another stir. 

5. While the butter is melting, stir together the remaining 1/2 cup flour and granulated sugar, baking powder, salt, 1/2 tsp cinnamon.  Add the milk and stir until the batter is just combined.  The consistency should be like pancake batter.

6. Pour the batter over the butter in the hot skillet.  Do not stir. Immediately spoon the peaches on top of the batter, making sure to include all the liquid that has accumulated.  Bake until the crust looks golden and crisp, about 30-35 minutes. 

7. Serve warm, topped with freshly whipped cream and a sprinkle of icing sugar (if you please!).  Enjoy! 😊

Ready to go in the oven!

The finished product.

Plated and ready for my belly! 


Monday, June 12, 2023

Stuffed Red Peppers

 I have always loved red peppers, especially sautéed with onions, garlic and my nonno's sausages.  When I make pizza, red peppers are a guaranteed topping!  I've tried a few different stuffed peppers recipes, but they never really hit the spot until this one!  I still haven't mastered the correct ratio (I always end up with more meat than peppers), but there's always enough for lunch the next day - and really it tastes even better the day after! The recipe as I share below will have leftover meat, so feel free to start another tray with more peppers....or save the meat to eat on its own (or in tacos!)!

Ingredients:
800g lean ground beef
1-1/2 tsp salt, divided
1/2 tsp baking soda
4 large bell peppers (red, yellow or orange)
3 tbsp olive oil
1 medium onion, finely chopped
3-4 cloves garlic, minced
1-1/2 tsp chili powder
1/2 tsp ground cumin
1/2 tsp dried oregano
2 cups tomato sauce
2 cups cooked rice
1-1/2 cups cheddar cheese, grated

Directions:

1. Preheat the oven to 425F.

2. In a medium bowl, mash the beef with 1 tsp salt and the baking soda, using your hands.  Let it sit for approximately 20 minutes while you move on to the other steps. 

3. Lightly spray the bottom of a 9x13" baking dish.  Cut the bell peppers in half from stem to the bottom, and remove the core and seeds. Place the peppers cut side up in the baking dish and drizzle with 1 tbsp olive oil. Sprinkle with the remaining salt.

4. Roast the peppers for about 20 minutes, until they are slightly browned and tender-crisp.  It is okay if liquid accumulates in the bottom of the peppers. 

5. In the meantime, heat the remaining oil over medium heat in a non-stick skillet.  Add the onion and cool,  stirring frequently, until it is soft and translucent, about 3-4 minutes.  Add the garlic and cook for another minute, trying not to brown things.  Add the ground beef and spices; increase heat to medium-high. Cook, breaking up the meat, until the meat is browned and almost cooked through, 5-7 minutes. 

6. Add the tomato sauce and bring to a boil; reduce heat to medium-low, cook uncovered until the meat is cooked through.  Add the rice and half of the cheese; stir until melted.  Remove from heat. 

7. Remove peppers from the oven and spoon the meat filling equally into each pepper half.  Sprinkle with the remaining cheese and return to the oven.  Roast for 10-15 minutes until the filling is hot and the cheese is melted and bubbly.  Serve. 

The stuffed peppers before
going in the oven.

The meat filling.....

I almost forgot to snap a picture;
I was so eager to enjoy it!

Some of the leftovers!