Showing posts with label chocolate. Show all posts

Friday, December 25, 2015

Holiday Baking Part 1: Fudge Four Ways

I've spent the last two days getting my holiday baking together and I'm exhausted.
For this post I am going to share 4 different fudge recipes: two that I've used for years and two new ones I'm trying this year.

I love making fudge because it really comes together pretty easily.  You just have to allow yourself time for it to set in the fridge or freezer.

Super Chocolate Fudge

This one is probably my favourite.  It has such a rich chocolate taste - perfect for the chocolate lover in your life.  I have substituted about half of the semisweet chips for milk chocolate and it still turns out great! For the nuts I have used walnuts, almonds or a mix of both, but I'm sure any nut would be a great addition - try your favourite.

Ingredients:
3 cups semisweet chocolate chips
1 can sweetened condensed milk
2 tsp vanilla
1/2 cup chopped nuts

Directions:

1. Melt chocolate with milk, stirring occasionally.  (For a quicker approach you can microwave for about 3 minutes or until it is melted.  Stir about every 30 seconds.)

2. Remove from heat; stir in vanilla and nuts.

3. Spread evenly in a parchment-paper lined 8" square pan.  Chill for 4 hours in the fridge or until firm.

4. Remove from pan and cut into small squares.

Makes about 64 1" squares.

Brown Sugar Fudge
The popular brown sugar fudge!

This is another great fudge, but a bit on the sweet side so cut them into small squares! This fudge turned out to be the most popular amongst my family.  It was gone so quickly!

Ingredients:
1 can condensed sweetened milk
2 cups well-packed brown sugar
1 cup (227 g) butter

Directions:

1. Place ingredients in a large microwave safe bowl and give it a quick stir.

2. Microwave on HIGH for 10 minutes, stirring every 2 minutes.  Let cool slightly.

3. Beat with electric mixer on low for 5 minutes.

4. Spread mixture into a parchment-paper lined 8" square pan.  Chill to set and cut into squares.

Makes about 64 1" squares.

Chocolate Peanut Butter Fudge

This is a new recipe I tried this year from the Bewitchin' Kitchen.  I really enjoyed this fudge.  The combo of peanut butter and chocolate is so yummy!

Ingredients:
2 cups peanut butter chips
1 cup semisweet chocolate chips
1 can condensed sweetened milk
1/2 cup Skor Toffee Bits

Directions:

1. In a microwave-safe bowl combine the peanut butter chips, chocolate chips and condensed milk.  Give it a quick stir.

2. Microwave for about 3 minutes until the chocolate has melted.  Stir the mixture every 30 seconds.

3. Pour the fudge into a 8" square pan lined with parchment paper.

4. Top with Skor bits and gently press down.

5. Freeze for a few hours until it has hardened.

I've decided to only share these three recipes as the fourth fudge recipe didn't seem to turn out so well for me.  It was a white chocolate & toffee fudge that just didn't seem to set properly.  It is currently sitting in my freezer because if I take it out it will probably thaw into a goo.  Some family suggested using it in a cookie recipe, which I might try.  Until then, I will stick with these three fudge recipes as my go to's!
LEFT: Super Chocolate Fudge
RIGHT: Chocolate Peanut Butter Fudge

Saturday, July 25, 2015

Chocolate Zucchini Muffins


I had a lot of zucchini lying around and I was debating between making a bread or muffins.  Since muffins are a staple in my house, it was an easy decision.  And since everything has to have chocolate (my little one's request), we decided to bake chocolate zucchini muffins.  An early wake-up call meant going downstairs, dressing up in our matching aprons and having a fun morning.

Ingredients:

3 cups all-purpose flour
1-1/3 cup sugar
1 cup unsweetened cocoa powder
2 tsp baking soda
1/2 tsp salt
1 tsp cinnamon
2 eggs, lightly beaten
1 cup unsweetened applesauce
1/2 cup vegetable oil
2/3 cup milk
1 tsp vanilla extract
2 cups grated zucchini
1-1/3 cup semi-sweet chocolate chips

Directions:

1. Preheat oven to 350F.  Line muffin tins with liners or spray them.
2. In a large bowl, stir together flour, sugar, cocoa powder, baking soda, salt and cinnamon.  Set aside.
3. In a separate bowl, whisk together the eggs, applesauce, oil, milk and vanilla extract.  Pour the wet ingredients into the dry ingredients and mix until just combined.  Fold in the zucchini and chocolate chips.
4. Divide the batter amongst each cavity; each should be pretty full.  Bake for 25 minutes or until a toothpick inserted comes out clean.  Cool 5-10 minutes in pan and then move to a cooling rack until completely cool.

Makes 24 muffins.


These taste especially good while warm as the chips are still gooey, but they still taste delicious when cooled.  They have a nice texture and are really quite moist.  You can't even tell that there's zucchini in them.  We will definitely be making them again - and sharing with our friends!

Thursday, April 9, 2015

Double Chocolate Banana Muffins

I love baking banana bread or muffins. It's pretty fast and easy to come together, makes a great snack, and I almost always have a couple of bananas that I have left too long and don't care to eat anymore.

All these reasons gave way to my decision bake them for work. To be honest, I had almost forgotten I signed up for this week's snacks and was kind of scrambling (I also needed to do groceries but it was hubby's soccer night so I wasn't going anywhere!).
I pulled up my go to recipe to make sure I had everything (you can find it here: Banana muffins ) and got on my way. As it turned out, I didn't have enough yogurt but I did have a little bit of sour cream so I used both in place of the yogurt; I think it was a bit more than I normally use (of course I didn't measure!). I also was craving chocolate so I added 3-4 tbsp of cocoa (which I also didn't measure but went till it looked chocolate-y enough for me). 

The result: really moist and delicious banana muffins. They seemed more moist than I remembered (now this could be because they really were OR because I hadn't had a gluten muffin in so long that I truly forgot how amazing and moist baked goods can be!) and the cocoa was a great addition. They were a ht at work and with my hubby and child!

I literally just tweaked a couple of things from my original post (Banana Muffins), but here is the recipe in its entirety. 

Ingredients:

1/2 cup oil
1 cup sugar
1 egg
1 tsp vanilla
3/4 cup plain (Greek) yogurt
3/4 cup sour cream
1-1/2 cups flour
1/2 tsp salt
1 tsp baking soda
1 tsp baking powder
3-4 tbsp cocoa (Dutch, unprocessed)
3 bananas, mashed
1 cup chocolate chips (semi-sweet)

Directions:

1. Mix oil, sugar, egg, vanilla, yogurt and sour cream in a large bowl.  Set aside.

2. In a separate bowl whisk together flour, salt, baking powder and soda, and cocoa.  Add the dry ingredients to the wet ingredients and mix well. (At this point, if it doesn't look chocolate-y enough, add another tablespoon of cocoa.)

3.  Add the mashed bananas and fold in.  Add the chocolate chips.

4.  Place the batter in lined (or greased) muffin tins, about 3/4 full. Bake in a preheated 365F oven for 20 minutes.

Makes 24 muffins.


Saturday, January 31, 2015

Chocolate Banana Bread

You may not know that I have been going gluten-free for about a month now.  While I haven't been diagnosed with anything, it is likely that the gluten has been causing (or at least contributing to) my thyroid problems as well as digestion problems.  So I've tried to cut it out.  Needless to say, I have been miserable, miss my foods and haven't seen a difference.

A few days ago I hit up my bulk barn and bought a bunch of different flours that are gluten free.  I love baking, and as I've come to realize, baking gluten free is definitely not the same.  Substitutions don't work and you need several different ingredients to mimic flour and gluten.  Today was my first attempt at gluten free baking.  I've had these ripening bananas sitting on my counter and banana muffins and bread are kinda my thing, so I was determined to keep it as my thing.

I have this book called Nourishing Meals so I decided to work with one of their recipes.

Dry Ingredients:
1 cup teff flour
3/4 cup sorghum flour
1/4 cup tapioca flour or arrowroot powder (I did about half and half)
6 tbsp cocoa powder
2 tsp baking powder
1 tsp baking soda
1/2 tsp salt

Wet Ingredients:
2 tbsp ground flax seeds
1/4 cup warm water
1-1/2 cups mashed bananas (about 5-6 for me)
3/4 cup sugar
1/2 cup melted coconut oil (or any oil really)
2 large eggs
2 tsp vanilla

Optional:
chocolate chips or chopped chocolate
chopped walnuts

1. Preheat oven to 350F.  Grease a loaf pan.

2. In a large bowl whisk together the dry ingredients.

3. In a separate (large) mixing bowl, add the ground flax and warm water; whisk together so the flax doesn't clump up.  Then add the remaining wet ingredients and whisk together.

4. Pour the wet ingredients in to the dry and mix together with a large wooden spoon.  Fold in your optional ingredients above (I did both!).  Pour batter into your bread pan.  Bake for about 45 minutes.  Cool for 20 minutes and then remove from pan and continue to cool on a wire rack.


My little one helped me with the baking and had a blast.  We also enjoyed licking the batter!  Surprisingly that batter didn't look all that much different from other batters I've worked with.  All my reading online caused me to think it wouldn't look "normal" but it did; maybe it was a little thicker than I'm used to. I probably kept the loaf in for about 50 minutes, but it could have used another 5-10 more as the middle still seemed a little moist.  Since it was my first time, and the batter is dark, I didn't want it to turn out too dry or hard.

The loaf turned out amazing!  You would never know that there wasn't flour in it.  The cocoa adds a richness to it that is almost fudgey or like a brownie!  It is definitely a hit in my house and my banana bread loving friends!


Thursday, March 14, 2013

Vegan Chocolate Avocado Cupcakes

Technically I am not supposed to eat dairy; I don't digest it well. For awhile (before I got pregnant) I was pretty good about not eating dairy, but that didn't stop my love (or cravings) for it. Once I was pregnant I found that I could digest it a lot better, so I was back on the dairy bandwagon. And I love it too much to give it up again. With that said, I try to limit my dairy, and I always look for good recipes that don't have dairy. A lot of vegan recipes fall under that category, but I am not a big fan of the flavor. When I found this recipe I decided to try it out, and it turned out really good.

The recipe is originally from this site: http://www.cookingandme.com/2012/11/vegan-avocado-chocolate-cupcakes-eggless-cakes.html#

And the frosting isn't vegan (or dairy-free!) so you'll have to find another frosting recipe if you want a true vegan cupcake.

Ingredients:
3 cups all purpose flour
6 tbsp cocoa powder
1/2 tsp salt
2 tsp baking powder
2 tsp baking soda
2 cups sugar
4 tbsp vegetable oil
1/2 cup chopped avocado (approx. 2 small avocados)
2 cups water
2 tbsp white vinegar
2 tsp vanilla extract


Directions:
1. Preheat oven to 350F. Line or grease 2 cupcake trays and set aside.
2. Chop up the avocado and add to a blender or a food processor.
3. Top off with oil, water, vanilla, vinegar, and sugar.
4. Blend well until the avocados get puréed completely.
5. Sift flour, cocoa, baking soda and powder, and salt in a bowl. Slowly add the wet ingredients while whisking.
6. Gently whisk together until you see no traces of the dry mixture in the batter.
7. Fill cupcake trays about 3/4 full.
8. Bake in preheated oven for about 30 minutes or until toothpick inserted in centre comes out clean or with dry crumbs. Tops may crack., but that's okay.
9. Cool completely before icing.

BUTTERCREAM FROSTING

Ingredients:
1 cup icing sugar
1/4 cup softened butter
1/2 tsp vanilla
1 tsp lemon zest

Directions:
Beat together all the ingredients until stiff. If the frosting is too dry, add some milk (by the drops) or butter. If it's too runny, add more icing sugar.


Wednesday, March 6, 2013

Chocolate chip Banana Bread

So tomorrow is the last day of the Mother Goose program I participate in with my little girl. This means it is a potluck as well. The easy answer would be to pick something up at the grocery store, but I remembered kinda late and didn't want to head out after she was sleeping. And tomorrow might be as hectic as today, so after my darling daughter was sound asleep, I decided to do some baking (even though all I wanted to do was crash on the couch!)

I always have some ripened bananas sitting in the freezer, so banana muffins or bread are always an easy go to. I always microwave the frozen bananas to thaw them quickly. And I found that they mash much easier and mix into the batter nicely.

Muffins take longer as you have to put them into the tins and most likely do a couple of rounds, so banana bread was the obvious choice - until I realized that the recipe I normally use has nuts in it and tomorrow's dish has to be nut-free.

So here is the alternative - a new recipe to try that I hope turns out. It's not always a good thing trying something new that you are bringing to a bunch of people you don't know very well. That's why my hubby and I will taste test this and hope I don't have to make a grocery run tomorrow!

INGREDIENTS

1 2/3 cups all-purpose flour
1 teaspoon baking soda
1/4 teaspoon ground cinnamon
1/2 teaspoon salt
1 cup plus 2 tablespoons sugar
2 eggs
1/2 cup oil
4 bananas, very ripe, mashed (thawed if you were using frozen!)
2 tablespoons ricotta mixed with 1 tablespoon each milk and lemon juice
1 teaspoon vanilla extract
1 cup semi-sweet chocolate chips (more/less to your taste)

DIRECTIONS

Set oven to 350 degrees F. Grease a loaf pan; set aside.

Sift together the flour, baking soda, cinnamon and salt; set aside. Beat sugar and eggs until light and fluffy.


Drizzle in oil. Add mashed bananas, ricotta mixture, and vanilla. Fold in dry ingredients and chips.


Pour into greased loaf pan and bake for about an 1 hour.


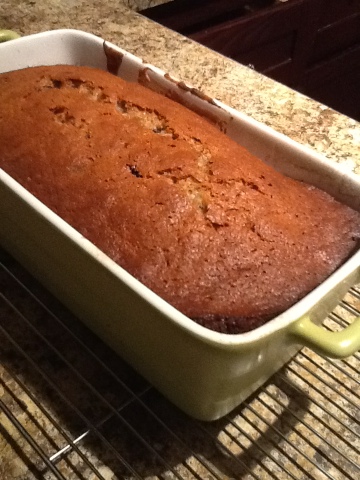
The final product. It took just over an hour to bake fully.


It turned out nice and moist and with good flavor. Let's hope the moms at Mother Goose like it as much as my husband and I did!